The idea of this camera started with vintage Profile Spotlight, that I wanted to restore, but found out, that some of internal lens elements were shattered. The only lens element, that was undamaged was the front element of it. Upon some closer inspection I discovered, that this element can project image circle big enough, to cover 8X10 area.
The obvious use of it was to create large format camera. but I didn’t want to bother with large format film and other hassles of creating proper large format camera, just for this weekend experiment. So, I decided to create something like Camera Obscura and photograph projected image with DSLR.
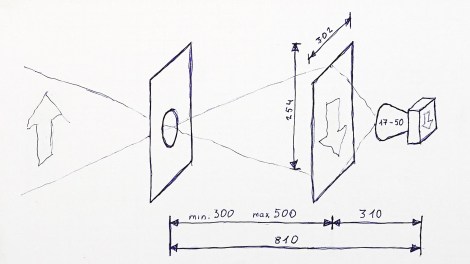
Below, you can see basic idea of the camera. As you see – the design is similar to any other large format camera, except this has DSLR added to it, to photograph projection on ground glass
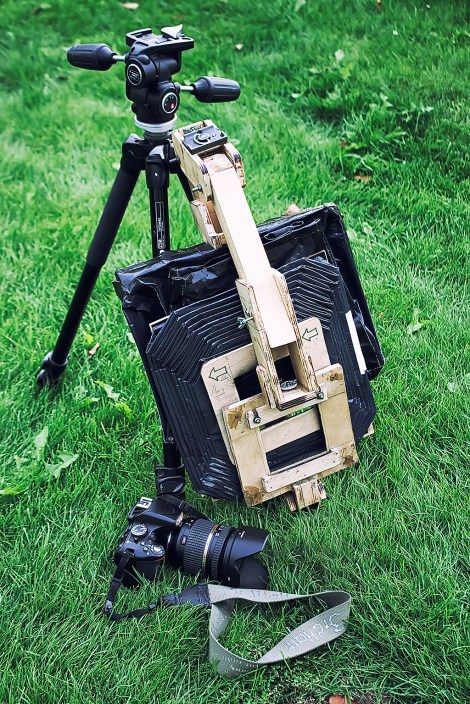
Fast forward two weekends and here is the finished camera:
“Let me show you its features!”
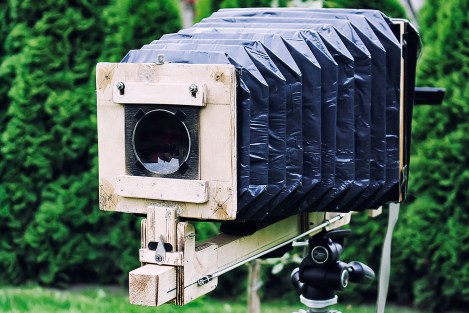
Because I didn’t want to invest much(anything) it this project – the camera was created from scraps and other trash lying around garage.
Lens was mounted in a piece of plywood, so I can flip it around, because the lens somewhat changes its look depending on which direction it is flipped. After some testing I found out, that focal length and f/stop of this lens is roughly 380mm f/5.1, that in 35mm equivalent would be something like 55mm f/0.73.
Bellows were created from office paper and black trash bags. Folding bellows was hardest part of this project. For more information, I suggest to visit jbhphoto.com, where you will find .pdf file with the most comprehensive information about making bellows on the interwebs.
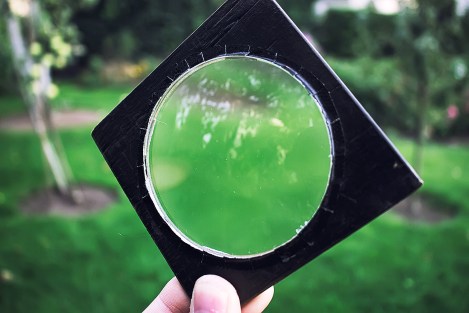
Ground glass was made from 2.5mm plexiglass, that I wet sanded with 800 grit sandpaper. At first I tried 1500 grit sandpaper, but I found out, that it was too fine and didn’t scatter light enough, to project clear image
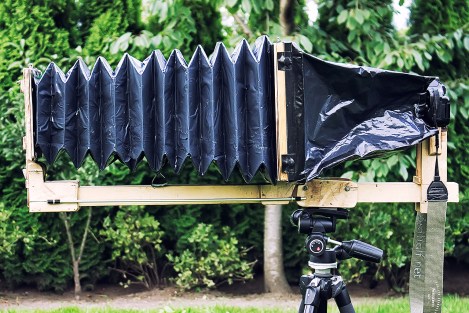
Also, the lens I chose for this project was Tamron 17-50mm f/2.8 VC that was used at its widest position. This allowed me to fill the frame with ground glass roughly 310mm. from camera’s image plane.
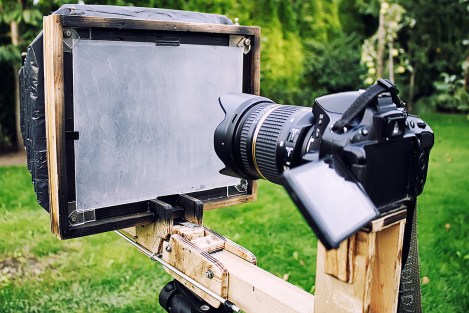
For focusing I made rod exertion, so I can focus the lens from back of the camera, while looking at live view.

To make this contraption usable on location – I tried to make it foldable and somewhat convenient to travel with. Well … as convenient as almost a meter long camera can be. 🙂
Now, let’s get to the important part of this project – the photos!
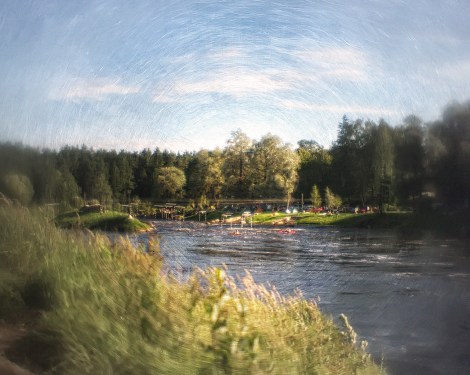
Exif: 1/50sec.┃f/4.5┃iso 100
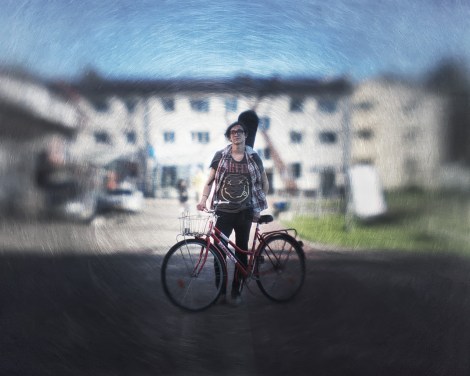
Exif: 1/60sec.┃f/4.5┃iso 100
The operation of this contraption is straightforward. At first I focused DSLR on ground glass and locked the focus. Then I used Live View to frame and focus the large camera.
Exif: 1/100sec.┃f/4.5┃iso 100
Because my tripod head was barely stable enough to hold this contraption – I had to use self timer to avoid camera shake. Also, shooting in the wind with this thing was major pain in the rear.

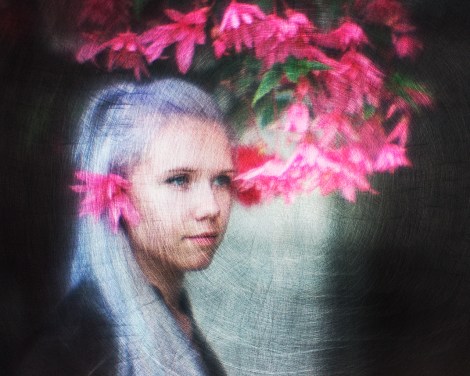
Exif: 1/2sec.┃f/4.5┃iso 100
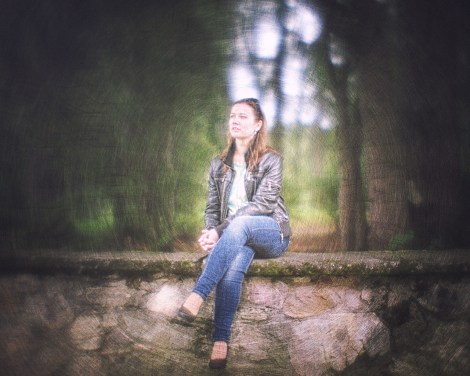
Exif: 1/2sec.┃f/4.5┃iso 100
Editing raw files was rather straightforward. After removing rather heavy vignetting – photo was edited like any other photograph.


Conclusions.
This was very spontaneous project, so I didn’t do much planning. At first I thought, that this will be “make it and throw it out” kind of project, but after playing around with this camera I think, that this should be a “thing”. I know that there are quite a few photographers with field cameras laying around, who would like to take them out for a spin once in a while, but don’t what to bother with process and cost of large format film. This should remove some of these problems. Sure, this won’t satisfy everyone, but this is better than collecting dust.
Here are some tips for someone, who want to try something similar:
Tripod: You should use sturdy tripod, with big quick release plate, for camera this big. Also, ball heads are not very convenient for operating camera this size.
Ground glass: I suggest to make proper ground glass, by grounding glass with Silicon Carbide powder, or chemical etching. This should avoid most of sanding scratches. And a Fresnel lens in front of focusing screen should remove vignetting.
That is pretty much it!
If you want to see my other DIY projects – feel free to snoop around this blog.
If you want to show support for my work and would like to see similar projects – “like” my Facebook page.

Pingback: DIY large format scrap camera - DIY Photography·
Pingback: This Large Format Camera Was Built with Garage Scraps and a DSLR | PictoPro·
Pingback: This Large Format Camera Was Built with Garage Scraps and a DSLR – Just Photography News·
Pingback: This Large Format Camera Was Built with Garage Scraps and a DSLR – Get Photo Tips·
Pingback: This Large Format Camera Was Built with Garage Scraps and a DSLR – Photography News World·
Pingback: This Large Format Camera Was Built with Garage Scraps and a DSLR #Photography | Stay Focus Photography·
Great project. Instead of a fresnel lens maybe you could scare up/buy a used “architectural” filter for your DSLR’s lens. It’s got a center gradient ND and would help control the vignetting and keep the center from being over exposed.
Thanks for comment!
Using ND filter wouldn’t be the best option, because ground glass vignetting isn’t same as regular vignetting.
Regular viggeting comes from the lenses that doesn’t throw equal light on whole image plane. Basically, lens throws less light in the corners.This can be corrected with ND filters.
But, the lens I used actually throws equal ammount of light on the whole 8×10 frame.
Now, where this vignetting actually comes from? Because image is projected through the ground glass – you see not just the projected image, but the lens opening too. Just like you can see the siluete of a person, through matted glass in shower – you see the lens opening through the ground glass. That is the bright spot seen in the middle of frame.
The problem is that this point is not does not have equal gradation, like regular vignette. Instead, it is a very concentrated hot spot, that in certain situations can be up to three stops brighter than rest of the frame.
Also, fresnel lens would make these corners brighter, but ND filter would just make the center darker. 🙂
Here are some examples of using fersnel lens on ground glass: http://i1357.photobucket.com/albums/q744/zhaoliang630/Yanke/GandFG3_resize_zps627214c3.jpg
I did kinda see the hotspot and was worried about evening out that exposure. Your probably right the architectural filter is just taking away light.
Again nice project and more importantly nice results. I’m working on my second scanner camera with a similar build…
and have lucite as ground glass. If the scanner bit does not work out I guess I could always get emotive and interesting pictures shooting through the camera body directly to the ground glass. Let me know how the fresnel works out.
Dayum – a scanner camera? That is something that’s been into my DIY bucket list too. 🙂
my solution to the problem
Pingback: InternetPhotographyClasses.com | This Large Format Camera Was Built with Garage Scraps and a DSLR·